Monday, December 30, 2013

2013 Year in Review May & June

Continuing my Year in Review with my favorite post and the most popular post based on comments, and repins on Pinterest.

May

My favorite was posted May 12th.
Most Popular was posted May 11th.

June

My favorite was posted on June 15th.

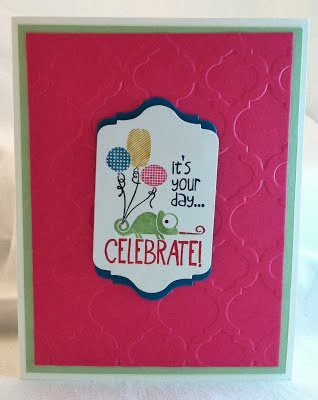
The most popular was posted on June 27th and was the Stampin' Llama's Blog Hop, and the most popular card based on re-pins was this one.

Did you have a favorite? 

Sunday, December 29, 2013

Year in Review March & April

Continuing my Year in Review with my favorite post and the most popular post based on comments, and repins on Pinterest.

March


My favorite from March was posted on March 12th
Most popular was posted on March 8th

April

My favorite from April was posted on April 5th
Most popular was posted on April 18th.
Did you have a favorite? 

Friday, December 27, 2013

2013 Year In Review January & February

I am sharing my year in Review I will post my favorite from the month and the one that seemed to be the favorite of others(using hits, comments and re-pins on Pinterest). But first here is a peek of what my husband bought me for Christmas.

I am going to add four more paper stacks then I will be pretty organized. 

January


My Favorite was posted on January 10th

Most popular was posted on January 6th

February

My favorite from was posted February 15th

Most popular was posted February 13th

Did you have a favorite? Leave a comment and let me know.

Sunday, December 15, 2013

CASEing Terri Antoniw

I CASEd a card from one of the blog hops I was in this fall, the card I CASEd can be found here. I changed it up a bit.


  • The card base is Whisper White CS, layered with Soft Suede CS.
  • I stamped Gorgeous Grunge  In Backed Brown Sugar on a piece of Whisper White cut at 3 3/4"x 5". I also stamped a phrase from Christmas Messages in Soft Suede. I added the tiniest pearls to the back ground.
  • I stamped the single Christmas Star on a piece of Whisper White in Baked Brown Sugar, I cut it out and scored it along the un-stamped lines. Folding every other line as Mountain or Valley.I stacked 4 Dimensionals at the center back of the star. I added a Glue Dot to the tip of each star point. I added the star to the card front. 
  • Last I added a pearl to the center of the star. 

Monday, December 9, 2013

Tag It

It has been a busy couple of weeks(see end of post for another baby picture)
  • The card base is Whisper White, Layered wirh Island Indigo CS.
  • I ran the Melon Mambo CS through the Big Shot in the Modern Mosaic Embossing Folder, adding it to the card base.
  • I stamped the image from Tag It colorong the stamp with the following markers: Gumball Green, Pumpkin Pie, Pacific Point, Real Red, Midnight Muse, Crushed Curry, Melon Mambo, Basic Gray.  Huffed on stamp then stamp onto Whisper White CS.
  • I ran the stamped image through the Big Shot cutting with Chalk Talk Framelit. I added Dimensionals to the back of the image and add to the card base.


Something about that little lizard makes me smile every time I make a card with it.


Saturday, November 30, 2013

Wow! What a crazy couple of weeks! I had a son getting surgery and a daughter having a baby, Thanksgiving was postponed until today because of the birth of a new granddaughter the day before Thanksgiving.

So here are the baby card selections from my last card buffet.

Card base is Smoky Slate
Girl Card: Cantaloupe Crisp
Boy Card: Coastal Cabana
Add the 4”x5 ¼” CS in color of choice to card base.
Run the piece of Smoky Slate CS through the Big Shot in an Embossing Folder of choice. Add to base.
On the Whisper White CS stamp the elephant from Zoo Babies in color of choice.
Run  the stamped image through the Big Shot with a Circle Framelit.
Add to the corresponding CS circle.
Flag cut the ends of the DSP strips.
Stamp the phrase from Banner Greeting on a scrap of Whisper White CS in color of choice, hand cut out.
Layer the DSP behind the cut phrase and add behind layered image.
Add to card front.

If desired stamp a sentiment to the inside.

Here is a picture of the newest member of our family.


Thursday, November 21, 2013

Llama Ladies Fall-i-day Hop

We are hopping again, just a mini one, but it still is fun ;)! You might have hopped here from my friend Buffy's blog. I have been enjoying her blog for several years now and I love to see what she is up to
My first card features a stamp from Novembers "Best of" set  called  Best of Snow.


  • The card base is Whisper White CS that I ran through the Big Shot in the Snow Flurry Embossing Folder
  • The hedgehog and snowman image is stamped on Watercolor Paper with Stazon ink. and colored with Markers. the snow is highlighted with Dazzling Details. I cut it out with a framelit from Chalk Talk. I added three banner flages behind the image, one that has a phrase from Christmas Tagables.
  • I layered it onto a Real Red CS piece cut with a framelit from Labels Collection.  

Next up Boxes! Four sizes!
Boxes for all the neighbor gifts. Bows are made from Ribbon, DSP Ornament Framelit, Joyful Christmas and a DSP bow. 
 And last another card

  • The card base is Coastal Cabana CS layer with DSP from Winter Frost Paper Stack.
  • I stamped the tree from Special Tree in Versamark on Whisper White CS and heat embossed it with Pewter Embossing Powder. I sponged Pool Party Ink and Illuminate in an oval around the tree. I stamped the greeting from the same set in Bermuda Bay Ink and layered it onto Bermuda Bay CS and added it to the card base.
I hope you enjoy my projects now hop on over to Jackie's Blog and check out her projects!


Thursday, November 14, 2013

The Wacky Watercooler Year End Blog Hop

Yes the Wacky Watercooler is hopping again! You may have just hopped here from Christine's Blog, Christine has given me some fantastic cards over the years so I am sure you were impressed with her work too.

I have been busy making Christmas cards, tis the season!
Card#1 Ornament Keepsake
It doesn't show in the photo but the Ornament sparkles, it has Dazzling Diamond mixed in with the Cherry Cobbler Embossing Powder
Score and fold Whisper White card base in half.
Run the Cherry Cobbler Corodinatons CS front through the Big Shot in the Stylish Strips Folder. Lightly sand and add to card base. 
Add Whisper White oval to card.
Dust a Whisper White CS piece with the Embossing Buddy.  Stamp Ornament with Versamark on to the Whisper White piece cover with Glittery Cherry Cobbler and heat with embossing gun. Run through the Big Shot with the Ornament Framelit. Add  Dimensionals to the back of the ornament and add to the oval.
On a Whisper White CS strip stamp phrase from More Merry Messages with Cherry Cobbler Ink cut with the Banner Framelit. Add Dimensionals to the back of the phrase and add to the card front.


Card #2 Greetings of the Season

Score and fold Pool Party card base in half.
Emboss the front of the card base with the Northern Flurry Embossing Folder.
Flag cut the ends of the DSP and Card Stock strips then layer them onto the card base.
Dust  the Whisper White Card Stock with Embossing Buddy then stamp with Bermuda Bay and Quickly cover with Iridescent Ice Embossing Powder and heat with Embossing Gun.
Run the stamped piece through the Big Shot cutting it out with Apothecary Accents Framelit 
Run the Island Indigo CS through the Big Shot cutting it with the Chalk Talk Framelit .
Layer the stamped piece onto the Island Indigo piece, add  Dimensional to the back and add piece over the banner piece.

Card #3 Santa's List


Score and fold Very Vanilla card base in half.
Run the Very Vanilla CS piece through the Big Shot centering the Circle Framelit  on it.
Run the Real Red CS piece through the Big Shot, use the Very Vanilla piece to center the next larger Circle Framelit.
Re-run the Very Vanilla CS piece through the Big Shot in the Pretty Print embossing Folder.
Center the Santa on the card base and stamp with Real Red Ink.
Layer the Real Red CS piece on the card base then layer with the Very Vanilla CS piece.

So this is my start on Christmas Cards I hope they have given you some ideas. Now it is time to hop on over to Gail's


Saturday, November 9, 2013

Sassy Salutations for Today's Card Buffet

This is a card choice from today's Card Buffet. Drop in by 4 pm and make 8 cards for $16. 14 designs to choose from.


·         Score and fold card base in half.
·         Layer the Elegant Eggplant CS on card base.
·         Layer onto the Wisteria Wonder CS the Shimmery White CS piece and the DSP piece,
·         Punch the Wisteria Wonder CS strip with the Scallop Edge Punch, cover the seam with punched piece. Add to the card base.
·         Stamp phrase of choice from Sassy Salutations in Elegant Eggplant onto the Shimmery White CS.
·         Use two Glue Dots to add butterfly to card.  Add Rhinestone Jewels to the butterfly.

             Yes I CASEd my friend Kathe for this card! http://kath-allthatscrap.blogspot.com/2013/07/yes-more-swaps-from-kathe-and-helen.html


Y

Thursday, November 7, 2013

Monstermaniacs

Here is one of the cards that can be made at Saturday's Card Buffet.
  • The card base is Whisper White.
  • Run a 4" x 5 1/4" Strawberry Slush CS through the Big Shot cutting it with a Deco Label Framelit. 
  • On a strip of Vellum CS stamp the sentiment from Sassy Salutations in Bermuda Bay. Wrap it around the Strawberry Slush piece and adhere to the card base.
  • Stamp the monster on a piece of Watercolor Paper with Stazon. Color it with Markers (colors used Pool Party, Strawberry Slush, Bermuda Bay and Blushing Bride) Run the image through the Big Shot cutting it with the smallest Deco Label Punch. Add Dimensionals to the back of image and add it to the card base. 
Fast and easy, my kind of card! The Stamp Set isn't in the catalog so here is the ordering info.
 Monstermaniacs

5
STAMPS
$14.95 US 134972
$17.95 CA 134972

Sunday, November 3, 2013

Card Buffet

Saturday November 9th
$16 for 8 cards choose from 14 designs.
Make 1 of 8 different cards or 8 of 1 card or any combination you like. Have extra time? extra cards are $2 each. Everything is prep for you so come stamp and put your cards together. 
Stamping will start at 7 am with the latest arrival time of 4 pm. So leave the kids with Dad or get a sitter and come spend a couple of hours creating. Bring a friend and get a prize! 
Christmas
Baby
Birthday
Wedding
and more!

Sunday, October 27, 2013

I Love Boxes!

I have a thing for boxes, I love giving gifts in boxes instead of bags, my children were the ones to teach me that lesson. Stamping up has several to choose from.

  •  Tag a Bag Gift Boxes (#130927) are in the main catalog are food safe they come 8 to a package.
  • I made a belly band to go around the acetate sleeve and decorated it with Joyful Christmas I stamped the poinsettia on Vellum CS, twice with Versamark and heat embossed it with Cherry Cobbler EP. I stamped the leaf three times and heat embossed it with Gumball Green EP. I cut them out with Paper Snips and layered them together with Glue Dots. I added Pearl Jewels to the center.
  • I used Greetings of the Season (carried over from last year #128033) and stamped the sentiment with Versamark and heat embossed it with Gold EP and added it behind the poinsettia.
So I think I will be filling these with cookies and giving them as neighbor gifts this Christmas Season.

Monday, October 21, 2013

Envelope Punch Board File Folder Birthday Card

I am loving the new Envelope Punch Board. For Club this month we made File Folder Cards. This is the card that I designed for club.

This is the card that we ended up with.

  • The card base is Coastal Cabana CS. The sentiment on the tab is from Teeny Tiny Wishes stamp in Melon Mambo.
  • Melon Mambo CS was run through the Big Shot and cut with the largest of the Apothecary Accents Framelit.
  • On a piece of Whisper White CS we stamped Birthday Cake, colors are Coastal Cabana, Melon Mambo, Bermuda Bay, Smoky Slate and Daffodil Delight it was ran through the Big Shot and cut with another Apothecary Accent Framelit, we rounded the square corners with the corner rounder. We layered it onto the Melon Mambo piece and added it to the card front. Rveryone was able to choose the color of Candy Dots to embellish their card with.
  • On a scrap of Whisper White CS they had a choice of stamping Wish Big from A Dozen Thoughts or the Happy Birthday from Banner Greetings. We flagged the ends and tucked it behind the image.
We had a lot of fun making these cards!

Thursday, October 17, 2013

Love & Sympathy

Were you wondering if I'd ever post?
This card uses the new Circle Card Thinlits Die. I have always liked flip/swing cards but often found it difficult to line everything up just right. With the new Thinlits Dies it is easy! This card was done with the Faux Watercoloring Technique using the Love & Sympathy stamp set.

Mostly closed
Open

  • The card is Marina Mist CS. I ran it through the Big Shot with the Circle Card Thinlits Die, it does the hard part by cutting and scoring all at once.
  • On Watercolor Paper I stamped the iris from Love & Sympathy using the Faux Watercolor Technique(instructions in this post), and cut it out with a Circle Framelit. I attached it to the card so that when closed it is on the front.
  • The sentiment is from Create a Cupcake and is stamped on Very Vanilla CS with Old Olive ink than punched with the Word Window Punch. I layered it on Old Olive CS punched with the Modern Label Punch. I added the smallest of the Pearl Jewels on both ends and added it to the card.
  • I stamped an additional sentiment from Create a Cupcake on Very Vanilla CS again in Old Olive. I cut it with a Circle framelit and added it to the opposite side of the card.
  • I added one each of the three small sizes of Pearls to the top curve of the card.
These flip/swing cards are so fast and easy to make!

Sunday, October 13, 2013

Life Gets Crazy

I know that it has been a couple of weeks since I have posted and I apologize for that, it has been a crazy and hard couple of weeks. I will be taking photos of a couple of cards and posting soon, so please don't give up on me.

Sunday, September 22, 2013

Upcoming Classes

Club
Club is starting and we have room for more! Club will be the first Tuesday of the month at 9 am and 6:30 pm. Club runs for as many months as we have members plus one additional month. Everyone gets a turn as Hostess.


Halloween Treat Class
October 15- 6:30 pm

Punch Art Class
October 16--6:30 pm- it's all about the owl punch
November 20--6:30 pm- Fancy Flower Punch

Card Buffet
October 19-- 9 am


Click on the the class tab for more information!

Thursday, September 19, 2013

Stampin' Llama

Welcome to our mini hop! You may have arrived her from  Stephanie's blog but if you are starting here the buttons at the end of this post will help you along the way. Stephanie designs our headers and buttons for all of our hops her work is amazing.

Here is my first card is an Autumn Birthday card


  • The card base is Sahara Sand CS with the feathers from Fine Feather stamped with Versamark
  • The pheasant was stamped with Stazon onto Watercolor Paper and colored with Ink and an Aqua Painter. I ran it through the Big Shot and cut it with the Labels Collection Framelits. 
  • I mounted it onto a piece of Cajun Craze CS that had been cut with the next larger Framelit.
  • I handcut feathers from Very Vanilla CS, tied them together with Linen Thread. 
  • The sentiment is from Create a Birthday stamped with Cajun Craze Ink.


My next card uses one of the single Christmas stamps.


  • The card base is Crumb Cake CS 
  • I ran a piece of Very Vanilla CS through the Big Shot in the Flowers a Plenty Embossing Folder and added it to the card base.
  • I added a piece of DSP from the Season of Style DSP. I used a piece of Brushed Gold CS punched with the Dotted Scallop Ribbon Boarder punch to cover the seam of the two papers.
  • I stamped Prince of Peace with Versamark onto Very Vanilla CS and heat embossed it with Gold embossing powder, then cut it out and popped it up with Dimensionals onto the cards front.


So there you have it a couple of fun cards that I hope you enjoyed, Now hope on over to Debbie's Blog.


Thursday, September 12, 2013

The Wacky Watercooler


Wacky Watercooler New Catalog(ue) Blog Hop

Welcome to our hop! You may have just come from Jeanne's blog and if you have I'm sure you enjoyed her projects. If you are starting here just keep clicking until you make your way back to me.

My first 3 projects use the Build a Banner Simply Created Kit(133507) on page 31 of the Holiday Catalog.
I made the create banner for my craft room. I used Sponge Daubers for all my stenciling. The colors I used are Coastal Cabana, Bermuda Bay and Rose Red. I strung the banner flags from Rose Red Seam Binding.

The next banner is a work in progress, I won't be finishing it until I hold my banner class because I will be using it for demonstration purposes.
I did this banner in Real Red and Encore Silver. I used the Red and Silver Glimmer papers and the now retired snowflake die. I layered the snow flake either Silver, Red, Silver or Red, Silver, Red. The centers of the snow flakes have a Vintage Faceted Designer Button with Rhinestone centered on it. Santa Banner stamped with Santa's List found on page 31 of the Holiday Catalog.

The Halloween Banner uses Most of the pieces from the Halloween Simply Created Accessory Kit, page 31. I couldn't use the Summer Starfruit pieces.
I made additional Lollies from DSP the Pumpkin Pie piece is from Quatrefancy Specialty DSP and Old Olive is from the DSP Stacks. I stenciled with Old Olive, Pumpkin Pie, Elegant Eggplant and Stazon.

My last project is a card using Truly Grateful stamp set found on page 19 of the Holiday Catalog.
The card base is Naturals White I stamped the panel stamp with Baked Brown Sugar. I cut banner cut strips of CS in Crushed Curry, Old Olive and Cherry Cobbler. I banner cut Cherry Cobbler Chevron Ribbon as well as Cotton Ribbon. I Stamped Happy Birthday from Create a Cupcake on the Cotton Ribbon in Early Espresso. I layers all the banners together an topped the off with two stamped acorns I used Crumb Cake, Soft Suede and Cajon Craze for the acorn.


Hop on over to Terri's Blog and see what she has in store for you.


 photo
nextwatercoolercrockbutton.jpg


For those of you that visit my blog regularly I will be posting irregularly for a couple of weeks, sadly I came home from work a week ago and found that my lap top no longer works I will be getting another one as soon as I can, until then I have to borrow computers to post.