Saturday, October 27, 2012

Seasonal Sayings


  • Card base is Cherry Cobbler the front of the card was ran through the Big Shot with the Petals-a-Plenty folder. I used the new Stampin' Dazzle Marker in gold to dot the centers of the flowers it is really pretty in real life.
  • I stamped the phrase from Seasonal Sayings in Versamark on Very Vanilla CS and heat embossed it with Cherry Cobbler embossing powder. I cut it out with the Apothecary Accents Framelit and sponged the edges with Lucky Limeade Ink.
  • I cut a piece of Candlelight Christmas DSP with another Framelit from the same set. I added it to the base and the popped the phrase up with Dimensionals.
I hope you are having a wonderful day!

Thursday, October 25, 2012

Stampin' UP! News

Have you heard the news? For a limited time Stampin' UP! is selling some of their stamps as singles.  Here are some links if you would like to check it out.
Single Stamps:
"Word Play"
Perfectly Penned
Seasonal Sayings 
Assortment #1(new)
Assortment #2(new)

I received an email from Stampin' UP! this morning here is part of what it said:
Three big things are happening on Monday, October 29 that you and your customers will not want to miss!
  1. For 24 hours only, almost every stamp we sell will be reduced 15 percent! We’re calling this the Sell-A-Stamp Spooktacular, and the goal is to sell more stamps in a single day than ever before. Even better, we are going to give you prizes for working with us to reach that goal! Learn more about this fun event on the Sell-A-Stamp Spooktacular page in the Promotions section of the demonstrator website.
  2. Our weeklong celebration of Digital Scrapbooking Day begins, and you and your customers can get FREE downloads and 50 percent off digital kits! Check out MyDigitalStudio.net on Monday for details.
  3. You voted for it—you got it! The winning project kit will be announced AND available starting October 29. Look for information about the kit and how to order it on Monday.  
So look for more later!

I had the day off today so I was able to make some cards as soon as I take pictures I will be posting them.

Monday, October 22, 2012

Moving Forward

I needed a baby card for my Card Buffet so this is what I came up with.

  • The card base is Whisper White with the lower third embossed with the Stripes Embossing Folder.
  • I colored the stamp of the boat from Moving Forward with markers and stamped it on a scrap of Whisper White and then cut it out with the Windows Collection Framelit. I layered it onto a Gumball Green CS cut the next size up. I added a Vintage Trinket brad into the lower curve off the Gumball Green CS.
  • I layered the image onto a square on Daffodil Delight CS that was layered onto a square of Marina Mist CS then added it to the front of the card.
  • I stamped the Welcome, baby from Petite Pairs in Marina Mist on a scrap of Whisper White and punched it out with the Modern Label Punch, I sponged the edges with Gumball Green then added a strip of Linen Thread to hang the phrase from the brad.
I hope you like this card, have a great day and go ahead and stamp something!

Saturday, October 20, 2012

Can You Name This Stamp Set?

Here is a card from my upcoming Card Buffet- I always have two cards that are retired stamps and paper.
Does anyone know the name of this set? I bought the set at a yard sale for $4, sadly it wasn't labeled.

Tuesday, October 16, 2012

Heart of Christmas

I had to try the Shaving Cream Technique with Christmas colors, this is the last card I made with this technique :).
  • The card base is Real Red, the front side of the card was ran through the Big Shot with the Lacy Brocade Embossing Folder.
  • I did the Shaving Cream Technique on Whisper White CS using Real Red and Gumball Green Re-inkers. I cut it out with a Window Frames Collection Framelit. (I lopped off the bottom curve)
  • Using Versamark I heat embossed the stamp Heart of Christmas in Gumball Green on Vellum CS, it was cut out the size down from my background.
  • I colored Rhinestones with a red sharpie, one was centered in a Faceted Button and added at the top and three were placed under the phrase.
  • The base of the image was wrapped with a Gumball Green Ribbon and then it was added to the card base.
I hope you enjoyed viewing the last few blog entries, have you tried this technique yet?

Sunday, October 14, 2012

Shaving Cream Technique Baby Card

Here is a baby card the uses the Shaving Cream Technique.

  • The card base is Wisteria Wonder
  • Re inkers for the technique are Pretty in Pink, Marina Mist and Wisteria Wonder.
  • I used Versamark to stamp the feet and phrase from Baby Prints and then heat embossed with Melon Mamba. I then cut it with the Labels Framelit and layered it onto Whisper White.
  • I made the bow with Marina Mist Taffata Ribbon and then pinned it with a Safety Pin from Vintage Trinkets. Hanging from the pin are three tags punched from the swirled scraps on has the word baby on it stamped in Marina Mist.

Friday, October 12, 2012

October Club Cards

So I started a new job this week thus the lack of posts. I'll do better next week.
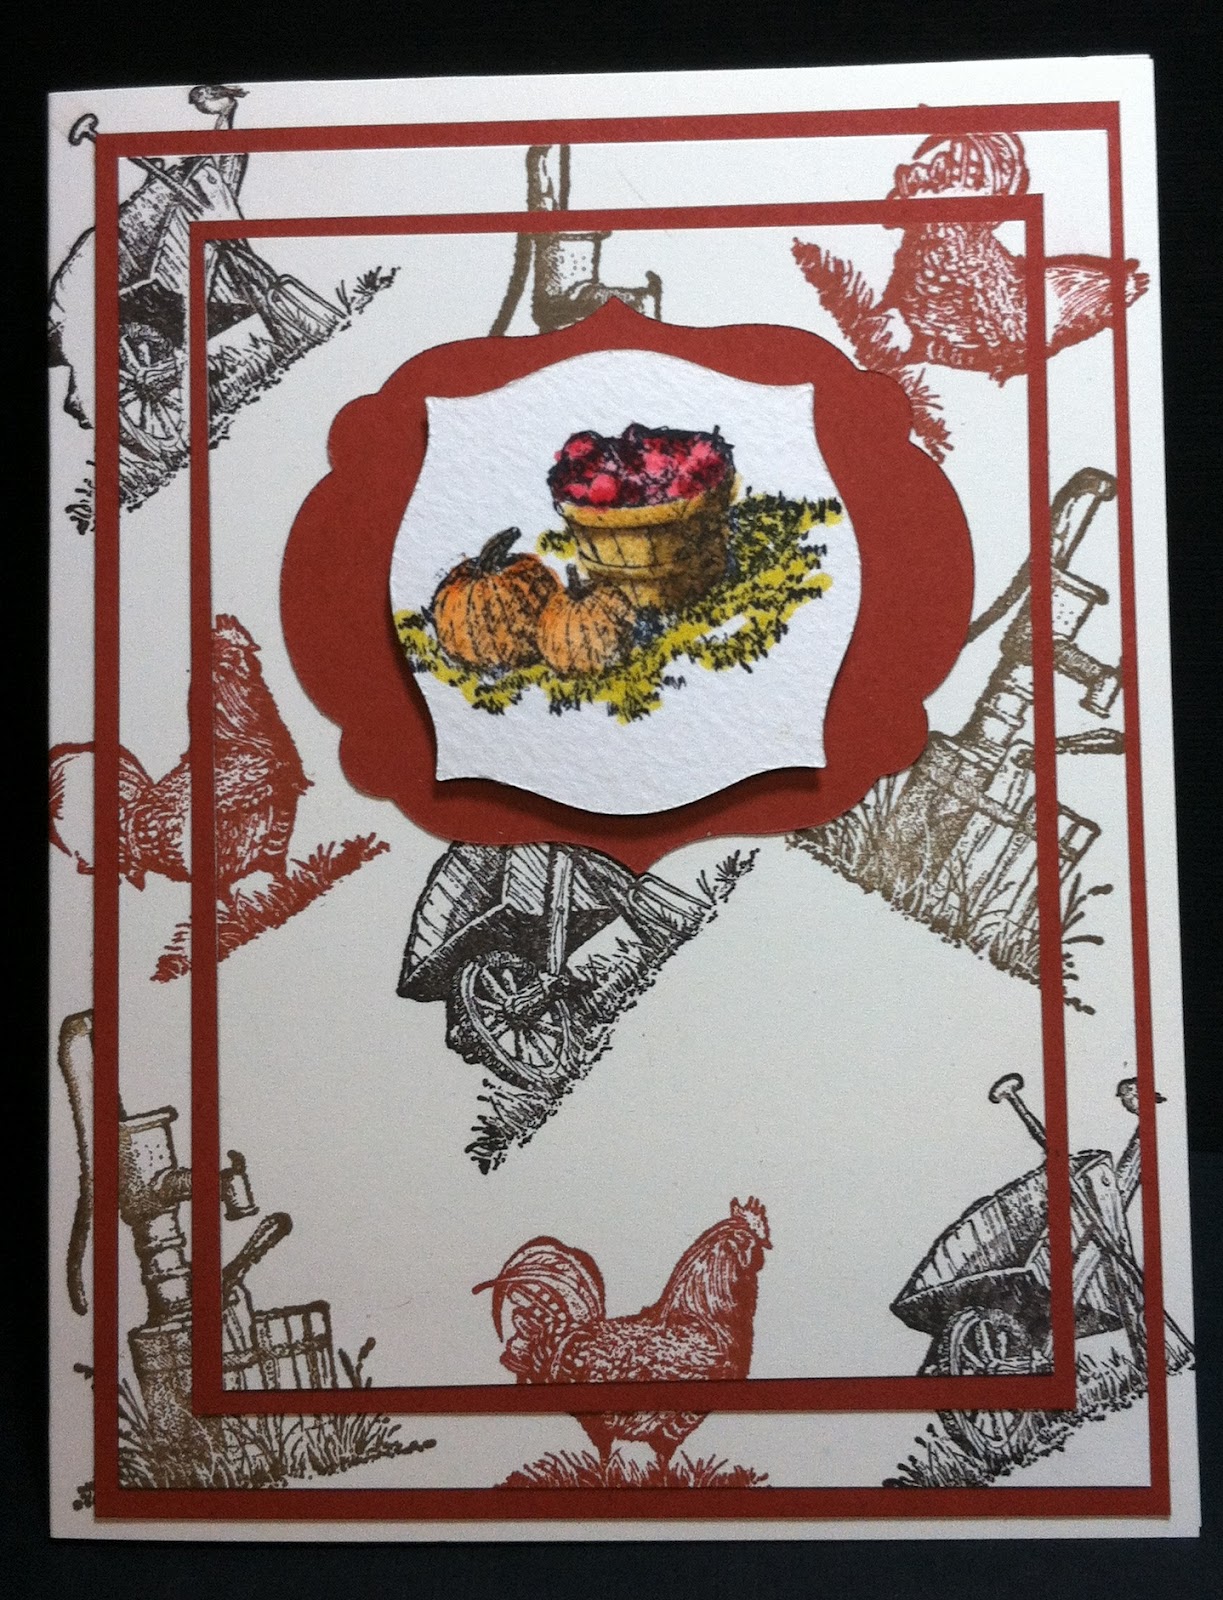
This month for club we did the Shaving Cream Technique, these are the cards we made, a halloween and a Thanksgiving.  The Technique is as follows.

Shaving Cream

Fill your container with shaving cream.   Use a wooden stick to smooth it out a bit.
Add several drops of each of your re-inker colors to your shaving cream.
Mix shaving cream and re-inker in a swirling motion.
Continue to mix until you like the design/swirls you see
Press your cardstock into the shaving cream. Make sure the card front is completely coated.
Pull cardstock out of the shaving cream.
Lay another piece of cardstock on top of the one covered in shaving cream. Press together, then pull apart. giving you two shaving cream coated pieces of cardstock.   This will give you two shaving cream coated pieces of cardstock.
Take a paper towel and wipe away the shaving cream in a swirling motion.
Let dry.
Finish your card. Either layer an image on top or stamp directly onto the background.


  • The card bases are More Mustard.
  • The DSP used to make the flags is from Howlstooth & Scaringboone.
  • I used More Mustard, Tangerine Tango and Cajun Craze reinkers for my swirls in my technique.
  • For the Halloween card the Frightening Feline was stamped with Versamark onto the swirled glossy paper and heat embossed with black. the image was cut with the Window Frame Framelit on layered onto Basic Black CS cut the next size up. The eyes don't show well in the photo but they are rhinestone colored green.
  • The Thanksgiving card has a phrase from Seasonal Sayings stamped with Versamark and heat embossed with Early Espresso. It was cut with the Apothecary Accent Framelit and layered onto Early Espresso CS.
I hope you have fun with this technique!

Sunday, October 7, 2012

Masking French Foliage

I hope you enjoyed our blog hop! We had fun doing it.  I was playing around the other day with Masking these are the cards I made.


  • The card bases are Naturals White. I used a large torn post it note to mask the base.
  • On the top card I sponged Perfect Plum on the lower card Perfect Plum and Daffodil Delight.
  • The leaf from French Foliage was stamped with Elegant Eggplant. Om the lower card a leaf was stamped on a scrap of CS then cut out after it was cut out it was pressed into Versamark and heat embossed with Clear Embossing Powder. I popped it up with Dimensionals.
  • The phrase from the From My Heart set and was stamped on a scrap of Naturals White with Elegant Eggplant, it was the cut out with a Apothecary Accents Framelit. I sponged the edges with Elegant Eggplant Ink then popped it up with Dimensionals.
So what do you think, Monochromatic or Eggplant and Daffodil?

Thursday, October 4, 2012

Hopping again- Fall-i-days Thanksgiving Blog Hop

Yes we are hopping again, last month we covered Fall and Halloween and this month we are still covering Fall as well as Thanksgiving. If at anytime you come to a broken like you can find us all here. We officially start at 8 pm Mountain so if you are here earlier then that some of the blogs might not be up and running so make sure you check back.

You may have come from Jackies wonderful blog but if you are just starting here that's OK too.
 Here are the cards I made for this hop.


  • The card base is Naturals White, I thought the colorful flecks worked with our theme.
  • I stamped the truck from Countryside with Stazon onto Watercolor paper. I colored it with Ink and an Aqua Painter. 
  • I layered it onto to colors I pulled from the colored image, Gumball Green, Cajun Craze and So Saffron.
Next another triple layered card..


  • Cutting directions can be found here.
  • The CS is Very Vanilla and Cajun Craze.
  • I stamped images from Countryside on my layers in Cajun Craze, Early Espresso and Soft Suede.
  • The water colored image is from Harvest Blessing stamped with Stazon and colored with Ink ans an Aqua Painter.
  • It is cut with the Apothecary Accent Framelit layered onto Cajun Craze CS cut with the Labels Framelit.

And the last one uses the technique that we will be doing this month in club (Sorry for the crooked picture).

  • The base on this card is Naturals White. 
  • The phrase from Pursuit of Happiness was stamped with Versamark and heat embossed in Early Espresso.
  • The back ground paper for the image is Glossy White that has the Shaving Cream Technique done in Cajun Craze, More Mustard and Tangerine Tango. The image from Harvest Blessing was stamped onto it with Versamark and heat embossed in Early Espresso. The image was cut with the Labels Collection Framelit and layered onto Cajun Craze CS cut the next size larger.
So there you have it my fall colored as well as themed cards, let me know what you think.  Now head on over to Buffy's blog and see what she has made. I think you will like what you find.

Monday, October 1, 2012

Holiday Hedgehogs

I know from time to time I have mentioned that my kids breed and raise hedgehogs, they are the cutest little animals. I know this is from a retired set but it is one I will hang onto.

  • The card base is Wild Wasabi. I used Versamark and heat embossed the Merry Christmas from Come to Bethlehem in Cherry Cobbler.
  • I stamped the image on Watercolor Paper with Stazon and colored it with Ink and an Aqua Painter.
  • I punched the image out with the 2 1/2" Circle punch and layered it onto a 3" Circle cut with the Big Shot. I popped it up on the card front.
I think it is cut and it was simple to make.