
Saturday, October 30, 2010
Friday, October 29, 2010
CASEing the Owl!

I made this page to show case the owl punch for my club.
I hope you enjoy the ideas and if you haven't bought the owl punch you might want to invest in it, let me know if I can help you with that :).
Wednesday, October 27, 2010
Holiday Lineup-in blue
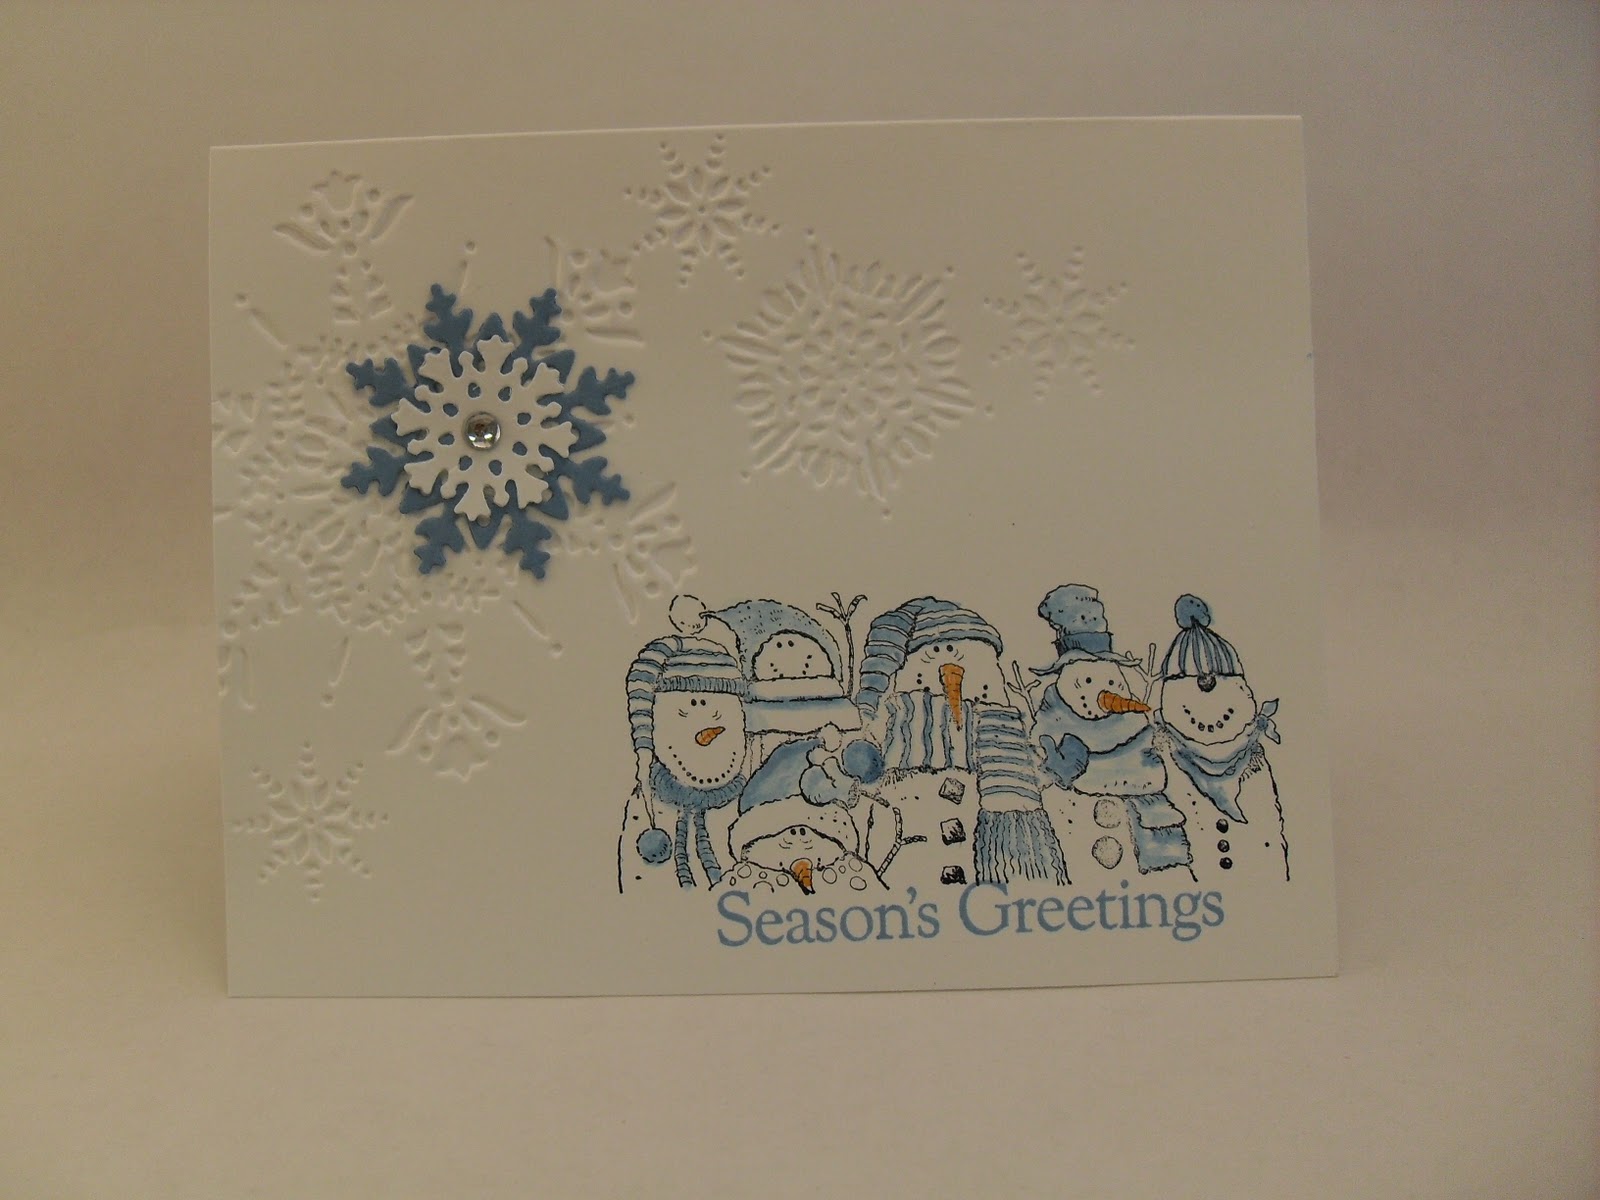
- Whisper White is the base of this card. I ran the front half of this card through the Big Shot in the Northern Flurry folder, I wanted to stamp the image on the right side so the front had to be the debossed side.
- I stamped the snowman from Holiday Lineup in Stazon onto the lower right side and colored it with ink pads and a blender pen. The only colors I used are Marina Mist and Pumpkin Pie.
- I stamped the greeting from Four the Holidays in Marina Mist under the image.
- I ran both Whisper White and Marina Mist CS through the Big Shot with the Northern Frost decorative strip. I sprayed the snow flakes with shimmer paint spray layered two of the and added it to the card with a Dimensional, I added a Rhinestone jewel to the center of the snowflake.
Have a great day and find some time to stamp!
Ok, I had some time today and went back and added more snowflakes. . . so which one do you like best?

Monday, October 25, 2010
Countryside/water pump

Another watercolor card. . .
- Card base is Very Vanilla with layer of Early Espresso that was run through the Big Shot with the Square Lattice folder.
- I stamped the pump on Watercolor paper with Stazon ink and colored the image with markers and an Aqua Painter.
- I layered the image onto a piece of Cajun Craze and added it to the front of my card.
The images from Countryside are suitable for men as well as women, so this card could be given to either, stamp a greeting on the inside and it could be anything from a Birthday to a Thank-you.
Have a great day and find some time to stamp!
Thursday, October 21, 2010
Dasher

- Card base is Crumb Cake.
- The Cherry Cobbler panel is 2 3/4" x 5 1/4" with a strip of Deck the Halls DSP on each side to make it a 4"x5 1/4" The Cherry Cobbler piece is raised up on Dimensionals.
- On the Cherry Cobbler panel I stamped both Dasher and the words from All Holidays using VersaMark and White Embossing powder. I wrap a piece of Organza Ribbon around the CS between the image and the words, then I added all the pieces to the Card base.
Monday, October 18, 2010
Just Believe

- The card base is Whisper White.
- The front is Daffodil Delight then another layer of Whisper White ran through the Big Shot with the Vintage Wallpaper folder, a Whisper White ribbon is tied around the front and tied in a knot, then added to the card base.
- The flowers are stamped in Daffodil Delight on Whisper White, over stamped with the phrase in Stazon. The image was then layered on Daffodil Delight and then added to the card front.
Today (10-19-10) I found out that two other ladies have made cards that are very similar to this one, I'm not sure if I saw them in the past (while blog hopping) and that the idea just stayed but I wanted to give credit to two others who have made this card. Christine Alward and Donna Powell Thanks for sharing!
Thursday, October 14, 2010
Delightful Decorations

- Card base is Crumb Cake with a front of Cherry Cobbler, the Cherry Cobbler was run through the Big Shot with the Petals a Plenty embossing folder.
- the ornament was stamped with Cherry Cobbler on a scrap of Whisper White and punched out with the Ornament punch.
- I ran a square of Crumb Cake through the Big Shot with the Square Lattice embossing folder I layered it onto the square of Cherry Cobbler and layered that onto a a piece of Crumb Cake that was ran through the Big Shot with the Petal a Plenty. This was all layered onto the card front.
- I used Dimensionals to pop up the ornament on the card.
- I died a piece of Taffeta ribbon with the Crumb Cake marker and tied it in a bow and added it to the top of the ornament with a glue dot.
Wednesday, October 13, 2010
More- Happiness Shared

- The card base is Very Vanilla, I ran it through the Big Shot with the Elegant Lines folder before I folded it in half.
- I stamped both images with Stazon onto Watercolor paper and watercolored with markers and an Aqua Painter. Colors used, Rose- Regal Rose and Rose Red, Leaves- Old Olive and Always Artichoke.
- Images were layered onto Old Olive and again onto Rose Red. The images were then layered onto the card base with the bud, on Dimentionals, overlapping the the full bloom.
Monday, October 11, 2010
Batty For You

- We colored directly on the stamp with markers, then stamped onto Whisper White, punched out the image with the 1 3/8" circle punch.
- Using Concord Crush we punched a Scallop Circle and attached our image to it.
- The mini take out box is made from Naturals White CS, with a florist wire handle and Ribbon tied to the handle.
Friday, October 8, 2010
Countryside

- The card base is Very Vanilla with a front of Not Quite Navy.
- I stamped the truck from Countryside with Stazon on Watercolor paper, we stamped the apple 3 times on scraps of Watercolor paper.
- Using Markers and an Aqua Painter we colored the images. By coloring directly on the paper in the areas you want the darkest shadows to be you can use the Aqua painter to pull the colors to the other areas. Going back and adding more marker and pulling it until satisfied with the depth of color. I used Not Quite Navy for the truck, Maria Mist for the sky(lay some water down on the sky area first and then maker to get a light even wash), More Mustard and Soft Suede for the ground, Garden Green for the sign, Riding Hood Red, Old Olive, Crumb Cake and Soft Suede for the apples and baskets.
- I layered the image on Riding Hood Red CS, wrapped Linen Thread around one side and added a Jewelry Tag stamped with a phrase from Tiny tags in Riding Hood Red on Very Vanilla CS.
- The 3 apples were colored with Riding Hood Red and Old Olive and then cut out. Using Glue dots I added them to the card front and then ran the card front through the Big Shot using the Square Lattice Die, embedding the apple images into the card front. I then added the front to the card base.
- Finished the card off by adding the image to the card and using Soft Suede to add the Pump image from the same set to the inside of the card.
Wednesday, October 6, 2010
Happiness Shared

- Card base is Whisper White with a front of Pearch Parfait, then a layer from the Hostess Level 1 DSP In Colors Pear Pizzazz.
- I stamped the image in Stazon on Watercolor paper for the rose I used Peach Parfait and Pumpkin Pie markers and an Aqua Painter, leaves are Old Olive and Always Artichoke.
- I layered the image on Peach Parfait and again on Pear Pizzazz.
- I warped a piece of Pumpkin Pie Ribbon around the Pear Pizzazz and knotted.
- I stamped the 4 You from Tiny Tags on Whisper White and punched out with the Jewelry Tag punch. I used croquet thread to tie it to the ribbon.
- I used Diemensionals to layer the image onto the card.
Monday, October 4, 2010
Birthday Bakery- Cakes

I often find that when I cut Watercolor paper for classes I get odd sized scraps. This stamp set works on a lot of those, the Watercolor paper I used on this card as well as the card in the last post were leftovers from cutting for other projects.
- Card base is Very Vanilla( I tend to use Very Vanilla whenever I use Watercolor paper). The Front is Very Vanilla that was run through the Big Shot using the Vintage Wallpaper folder.
- Using Stazon I stamped the cakes on Watercolor Paper and colored using Markers and an Aqua Painter, this seems to be my favorite way to watercolor lately.
- I layered my image on Tempting Turquoise and Melon Mambo(photo color is off), then layered it on a piece of Very Vanilla that I ran through the Big Shot with the Square Lattice folder, centering it on the card front.
Friday, October 1, 2010
Birthday Bakery

- Card base is Whisper White with a front using Pear Pizzazz DSP.
- I stamped the images on Watercolor Paper using Stazon.
- I colored the images using Markers and an Aqua Painter. Colors used Regal Rose, Pear Pizzazz, Daffodil Delight.
- I layered the gift bag image on Regal Rose, again on Daffodil Delight and last on Pear Pizzazz. I used the Scallop Trim corner punch on the Pear Pizzazz.
- I punched two strips of scrap Regal Rose with the Dotted Scallop Ribbon Border and added them to the top and bottom of the cake image.
- I added both images to the card front using Dimensionals to pop up the gift bag.
Subscribe to:
Posts (Atom)