Showing posts with label Valentine card. Show all posts

Sunday, February 8, 2015

WCC17 - Valentine's Day challenge


Here is my card for our Water Cooler Challenge, you can go to our home blog to see what the other team members created.
Stamp: Hey, Valentine
Paper: Whisper White & Basic Black, Stacked with Love DSP Stack
Ink: Memento Tuxedo Black & Blendabilites
Misc: Note Tag Punch, Square Collection Framelits

I used a Square Framelit to cut out the square that is behind the fox, it was cut from the center of the piece that is below the black layer.

Saturday, February 7, 2015

PCCCS#130

I like the sketches that Paper Craft Crew Challenges puts out, #130 is a fun one to work with. I went with a masculine Valentine.
Stamps: Guy Greetings
Paper: Basic Gray, Whisper White & Real Red CS, Stacked with Love DSP Stack
Ink: Memento Tuxedo Black & Real Red Ink Pads,, Natural & Smoky Slate Blendabilities
Misc: Basic Black Bakers Twine, Itty Bitty Punch Pack Heart, Banner Punch and misc handheld heart punch

Here is the sketch I worked from:
Click on image to go to site

Thursday, January 29, 2015

You Plus Me- Sweet

Another card with You Plus Me!
Stamps: You Plus Me
Paper: Whisper White & Basic Black CS, Stacked With Love DSP
Ink: Real Red & Basic Black
Misc: Heart Punch & Dimensionals

On the Black Heart I colored all the little white hearts with Real Red.

Monday, January 19, 2015

You Plus Me=Twitterpated

Another Valentine, loving red, black & white.
Stamps: You Plus Me
Paper: Whisper White CS & Stacked With Love DSP
Ink: Real Red
Misc: Heart Punch & Dimensionals

I think this one might be for my husband...

Thursday, January 15, 2015

Sheltering Tree

This makes a fun Valentine!
Stamps: Sheltering Tree, You Plus Me & A Round Array
Paper: Whisper White CS & Stacked With Love DSP, Red Glimmer Paper & Dazzling Diamonds Glimmer Paper
Ink: Soft Suede, Chocolate Chip, Pink Pirouette, Strawberry Slush, Real Red & Pear Pizzazz
Misc: Dimensionals

Those tiny hearts stamped in the trees leave are from You Plus Me.

Thursday, January 17, 2013

I Dig You

Here is another card we made at class, this was my Granddaughters favorite.

  • The card base is Crumb Cake with a front of Island Indigo CS and a layer of Whisper White.
  • On the Whisper White I sponged Crumb Cake at the bottom and lightly sponged Pool Party for the sky.
  • On a scrap of Whisper White I stamped the truck from I Dig You in Real Red with Basic Black wheels, I cut it out and popped it up with Dimensionals.
  • I filled the back with hearts cut with the Fashionable Hearts Embosslit, letting some spill over.
  • I stamped the phrase from Teeny Tiny Wishes in Island Indigo.
I hope you enjoy the card and are busy making your Valentines.

Tuesday, January 8, 2013

Magic Snowflake Technique

So this (Magic Snowflake) is this months technique for club over the next few days I will show you the cards I decided not to do for club and then I will post the card we made.

So this is my first idea

  • The card base is Whisper White with a front of Rose Red layered with Cherry Cobbler.
  • On Glossy CS I stamped the phrase from Wacky Wishes(Hostess Set) and did the Magic Snowflake Technique using Pretty in Pink, Melon Mambo and Rose Red.
  • I made a Cherry Cobbler band across the front with a Adorning Accent folder layered on Whisper White that was cut with the Adorning Accents Edgelit,
  • On Whisper White I stamped the heart from Heats a Flutter in Rose Red and Cherry Cobbler and added them to the card.
So this was card number 1.

Saturday, February 4, 2012

Swapping Again

My friends and I are swapping again! the first card I received was from Robin Cosca.
Here is her supply list.
Stamps: Fresh Vintage (SAB), P.S. I Love You (Occasions Mini)
Ink: Real Red
Paper: Real Red, Very Vanilla, Pink Pirouette
Other: Heart to Heart, Large Tag, Extra Large Tag punches 

Wednesday, February 1, 2012

Cute As A Bug!

It has been fun pulling out retired sets and using them again, as a demonstrator it seems that we spend so much time planning for events(ans that requires current sets) that often sets that we loved sit unused.  I am lucky two of my neighbors as well as good friends have been customers of SU for almost as long as I have.  I borrowed sets from them as I was making cards to fill my order for our local store that is carrying my cards.  This Valentine uses the set Cute as a Bug.

  • The card base is Real Red.
  • I cut a piece of Regal Rose with the Label Framelit and then ran it through the Big Shot again with the Starburst embossing folder. I cut a piece of Glittery retired DSP with a smaller Framelit and with the next size smaller I cut a piece of Very Vanilla CS.
  • With Stazon I stamped the Spider on the piece of Very Vanilla CS, underneath it I stamped "Be Mine" in Real Red.  
  • I added a small black heart from the Fashionable Hearts Embosslit, then I added a small heart punched from the Silver Glitter paper, to make it pink I actually sponged Cherry Cobber on it.
Framelits and Embossing Folders add so much to a simple card.

Tuesday, January 31, 2012

Outlined Occasions- Love

This card uses a Sale a bration stamp set as well as retired DSP.

  • The card base is Pretty in Pink with a front of Basic Black layered with retired DSP, The DSP is glittery.
  • I stamped the LOVE with VersaMark on Whisper White and embossed it with Black. I then ran it through the Big Shot with the Heart Framelit, after it was cut out I stamped the be mine with Stazon. I filled in the outlined word and hearts with Cherry Cobbler Dazzling Details.
The longest time spent making this card was letting the Dazzling Details dry.

Hope you like the card, feel free to comment. 

Monday, January 30, 2012

P.S. I Love You- En Francais

Here is another of the Valentine cards I delivered to a local store.

  • Card base is Crumb Cake, a front of Whisper White with a Cherry Cobbler layer that was ran through the Big Shot with the Starburst Embossing folder.
  • On a piece of Whisper White I stamped the background stamp En Francais with Crumb Cake, I also sponged the edges with Crumb Cake.
  • On a scrap of Naturals White I stamped the phrase from P. S. I Love You in Cherry Cobbler and punched it out with the postage Stamp punch. I sponged the edges with Crumb Cake and added it to the front of the card.
  • I over stamped the stamp with the post mark from P. S. I Love You in Cherry Cobbler.
  • I decided to add the post mark from French Foliage as well this is in Crumb Cake stamped on the back ground piece.
I have been using a lot of retired sets to make cards for the order I delivered to Stokes (a local store here in my town). I will show those in the coming days, it was fun to pull out old favorites and play with them.

I hope you have a wonderful day!

Saturday, January 28, 2012

P.S. I Love You

SO I just delivered 6 dozen cards to a local store (Stokes) for resell. This is one of the cards I made.

  • Card base is Naturals White with a front of Cherry Cobbler and another layer of Naturals white sponged with Crumb Cake.
  • On the Naturals White layer I stamped the background writing from French Foliage in Pink Pirouette, love you kiss you.. from P.S. I Love You overlapping in Cherry Cobbler.
  • I cut a piece of Cherry Cobbler CS with the Scalloped Rectangle Clearlits Die using my Big Shot.
  • I stamped cupid from P.S. I Love You in VersaMark embossed it with my glittery Cherry Cobbler powder, I then  I cut it to fit inside the Cherry Cobbler rectangle added it to the front of my card.
  • I inked the postmark From P.S. I Love You in Cherry Cobbler and stamped it off the edge of the cupid image. I inked up the postmark from French Foliage in Crumb Cake and stamped it going off  of the image as well.
I hope that you are having a wonderful day. Email me if you would like to place an order. $50 order= 1 free Sale a bration set.

Wednesday, January 25, 2012

Gnome Sweet Gnome

Stampin' UP! gave this set to me, I wasn't thrilled with the set but it was FREE.  When my granddaughter unpacked my order for me she was so excited with this one, she love, love, loved it!  It has grown on me and I see potential in it.

I made a Valentine with my granddaughter and her love of this set in mind.

  • Card base is Real Red, the paper that is behind the image was cut with one of the Label Framelits, it was a piece that has been in my scrap box for about 8 years (please tell me you hang onto scraps for forever because you never know when you might need it)
  • I stamped the Gnomes with Stazon onto Watercolor paper and then cut it with a nesting size Framelit, I colored the images with ink and a Blender pen.
  • The hearts(Brushed Silver and Real Red) were cut with the new Fashionable Hearts Sizzlit. Two were layered between their hands and a lager one was added to a Vellum flag with Happy Valentine's Day from Teeny Tiny Wishes stamped in VersaMark and embossed with glittery Cherry Cobbler Embossing powder.
There you go. . . what do you think of it?

Thursday, January 19, 2012

Motorcycle Valentine

I think this is the sample that was the deciding factor in the local store deciding to carry my cards.
I was so sad that this stamp had such a short catalog life.

  • Card base is Real Red, layered with Basic Black then Brushed Silver that was ran through the Big Shot with a Texturz Plate.
  • I stamped the motorcycle on Watercolor Paper and then used the Framelits Hearts to cut it out. I used Ink and Aqua Painter to color the Image.
  • The same computer generated phrase as I used yesterday was popped up with Dimensionals on the card front. 
This is the other card that I have already sold some of from my stash.

Wednesday, January 18, 2012

Out West- Valentine


Our only store in town is a combined Grocery/Ace hardware store, but we were happy when it opened 2 1/2 months ago.  They are going to be carrying my cards for sale. I have been busy making cards to replace the cards my granddaughter sold at Christmas time, with Valentines coming up I have been making a wide variety of cards. Here is one using Out West.

  • Card base is Marina Mist with a front of DSP (from the holiday mini so sadly no longer available).
  • On a piece of Very Vanilla  CS I stamped the cowboy with Chocolate Chip Craft Ink and Clear Embossed it. I then cut it out with the Label Framelits, I layered it on a piece of Chocolate Chip CS cut the next size up.
  • The phrase is computer generated and printed on Very Vanilla, the hearts (Very Vanilla and Real Red) were punched one with the lg Heart Punch and one with a Framelit Heart.
  • The Embossed hearts in the upper corner are Very Vanilla, Real Red and Chocolate Chip(my granddaughter spent an hour in my craft room running CS through the Big Shot using up a lot of my scraps, she even sorted them by size into a divided box) cut with the Fashionable Hearts Embosslit from the Occasions Mini.
I have already sold some of this one and it hasn't even made it to the store yet.

Monday, January 16, 2012

Framelits Label Dies

If you haven't bought the Framelits yet you need to!

  • The card base is Melon Mambo cut with the largest of the Framelit Label Dies. The front is Basic Black cut with the next smaller size.
  • On the Basic Black CS I stamped the branch of roses with White Craft ink
  • On a scrap of Whisper White I stamped the Valentine phrase from Delightful Dozen, I inked it with Melon Mambo then went over the "Be my" with a Black marker before stamping. I then laid different Framelits over it until I found the one that framed the phrase the best. I sponged the edges with Melon Mambo ink and popped it up with Dimensionals.
  • After I had it put together I decided to add the 3 Rhinestones under the phrase.
So what do you think of Framelits?

Monday, February 14, 2011

Valentines and Love

Today I thought I would do a tribute to cards I have made about Love and Valentines over the last few years, here are cards I have made and posted in the past, my style has changed and hopefully improved over the last couple of years.


All but one of these cards was posted somewhere on this blog in the last 3 years. Do you remember them?

Sunday, February 6, 2011

Take a Spin- Valentine's Z card


This is a card that we made for our January Club meeting, using the Take a Spin stamp set.

  • The card is made with a 12" x 4 1/4" cut a an angle to 3 3/4" piece of textured Chocolate Chip card stock, scored and folded every 4" to make a Z. 
  • Using the large Heart punch we punched 6 each Whisper White, Regal Rose and Rose Red hearts, these were attached to the top of the card, sandwiching the top edge between matching hearts.
  • The stamp was inked up in Regal Rose and then with a marker we colored the wedge that was the Valentine's with Rose Red, stamping onto Whisper White CS and punching out with the 2 1/2" circle punch.
  • We attached the Spinner Hands to the stamped circle attaching it to the card front after punching a piece of Rose Red CS with the scallop Ribbon punch and centering the piece on the card front.
  • The girls could decorate the inside how ever they desired.


Wednesday, August 25, 2010

CASEing Vickie Burdick


When I started planning cards for my Greeting Card Kids class (tomorrow) I had a hard time thinking of a card for this image, I had already planed one that I cut the image out cutting off the heart and making it into a birthday card. But as a Valentine's day card it wasn't coming to me, then I found Vickie's card (check it out )http://itsastampthing-vicki.blogspot.com/2010/07/mtsc84thank-you.html  as you can see I CASEd it pretty closely. 
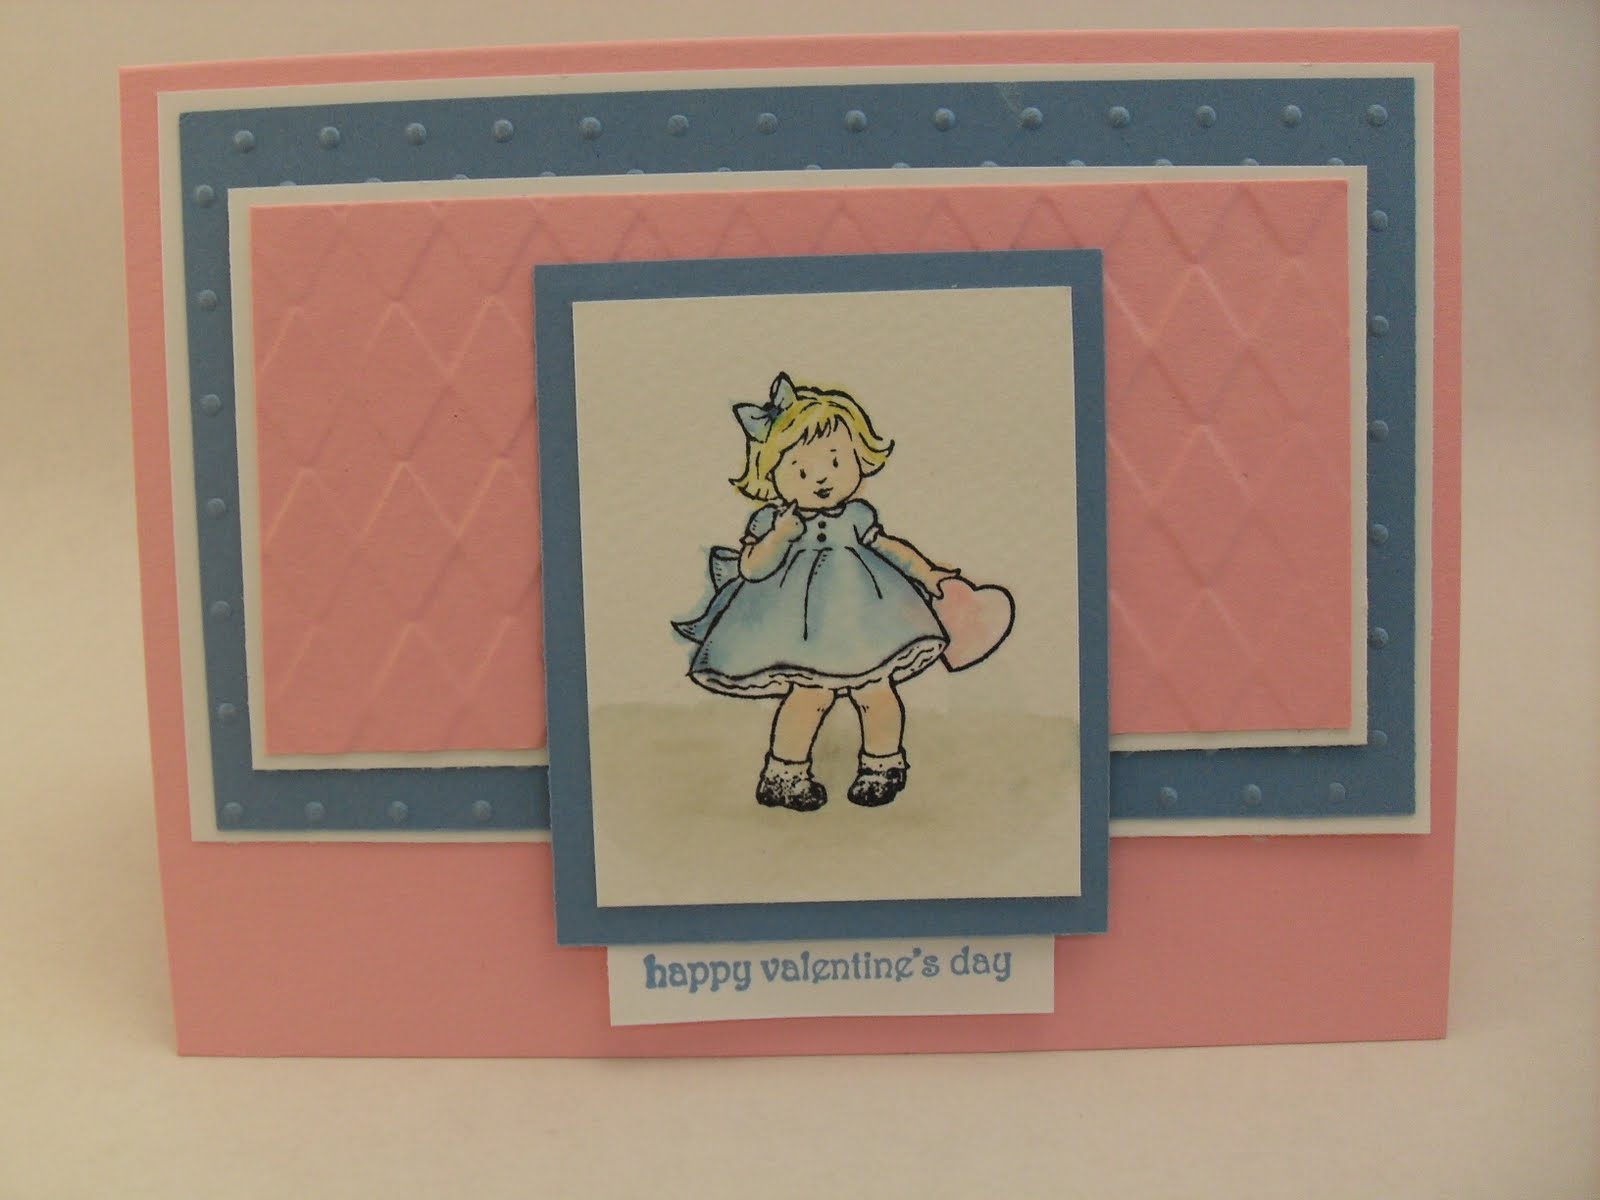
• Fold Pretty in Pink card base in half


• Stamp image with Stazon in the center of the WCP, color with markers and an Aqua Painter, colors used Pretty in Pink(heart), Marina Mist(dress and bow), Daffodil Delight(hair), Blush Blossom(skin), soft Suede (for shadow to ground image)

• Run the Pretty in Pink CS through the Big Shot with the Backgrounds Textures Plate, layer it on Whisper White. Run the Maria Mist through the Big Shot with the Perfect Polka Dots folder layer on Whisper White. Add the Marina Mist/Whisper White layer on the card base; add the Pretty in Pink/Whisper White on top.

• Stamp happy valentine's day from "Teeny Tiny Wishes" on the piece of Whisper White with Marina Mist

• Layer the image on Marina Mist, adhere the phrase behind the Marina Mist and center on the card.