
Showing posts with label Elements of Style. Show all posts

Thursday, April 11, 2013

Helping a friend.

I have a friend that works with unwed mothers that are or have given their babies up for adoption she want something to give the girls at different times as they go through this experience. We have been using up a lot of my retired Designer Series Paper making ribbon pulled wrapped chocolate bars(google it if you don't know what these are) We have been making takes to go on them as well.  Here are two of the tags we made.
We also made birthday tags but I didn't get pictures of them. We made about fifty of them.
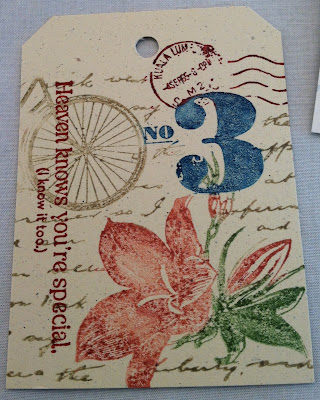


  • This tag starts with Naturals Ivory CS for the tag.
  • I used markers to color the stamp from Postage Due and then stamped it on the tag.
  • The phrase from Blessings From Heaven was stamped in Raspberry Ripple and added to the tag
  • This tag is Naturals White CS
  • The flowers from Elements of Style was stamped with Elegant Eggplant.
  • On a scrap of Naturals White I stamped the phrase from a past Sale a bration set in Crushed Curry and punched it with the Curly Label Punch, then sponged Garden Green around the edges and popped it up with Dimensionals.
So that is what I've been working on lately. What are you creating?

Tuesday, April 3, 2012

A Wedding Card

I think this must be a CASE but I can not find the card if it is, I try to keep a file on my computer of cards that catch my eye, some because of color combos, some for there layouts and some to just plain copy. This card is not in that folder and I can'r find one with Goggle, I just don't think I came up with this on my own. Now with that disclaimer are you ready to see what the heck I am talking about?  Well here it is. . .


So have you seen this card somewhere else? If so link to this so I can see it. If not maybe I am better at card making then I thought ;).

One of these cards was cut 4 1/4" x 11" and one 5 1/2" x 8 1/2"
For this card

  • The card base is Whisper White 4 1/4" x 11" folder in half
  • En Francais was stamped in Versamark then onto the front, then covered with gold embossing powder and heat set.
  • On a piece of CS Vellum cut at 4" x 5 1/4" I stamped an image from Elements of Style in Versamark and heat embossed with Gold, this was attached to the front with two Mini Glue dots in the upper corners then a satin Whisper White Ribbon was tied around it to cover where it is attached.
  • On a scrap of Whisper White Mr & Mrs from Tiny Tags was heat embossed Gold I then cut it out with the smallest Heart Framelit. It was layered onto the next larger heart cut from Brushed Gold CS. I small hole was punched in the heart and it was threaded onto some non Stampin' UP!(I've had for years and don't even remember where it came from) wire edged ribbon that I tied around the Satin ribbon the then wrapped the ends around the paint brush that comes with the Embossing trays.
A fairly Elegant card!

Wednesday, March 7, 2012

Elements of Style Chalkboard Technique

This is the card that we made in Club this week, our technique that we added to our books is the Chalkboard Technique.

  • The card base is Naturals White with a front of Garden Green, layered with Regal Rose.
  • On a 3 1/2" x 4 3/4" Basic Black we stamped the roses from Elements of Style with White Craft Ink we then colored over the White with Chalks, the corners were punched with the Scallop Trim Corner Punch.
  • On a scrap of Naturals White we stamped the Get Well from Delightful Dozen in Garden Green and sponged the edges with Regal Rose. this was popped up with Dimensionals on a square of Naturals White that was punched with the Scallop Trim Border Punch.
Thanks for stopping by!

Sunday, February 19, 2012

Gold & White Wedding

This card uses 3 different stamp sets.

  • The card base is Whisper White cut at 4 1/4" x 11" folded to make it the standard 4 1/4"x 5 1/2". The front was stamped with En Francais inked with Versamark and heat embossed with Gold Embossing Powder.
  • The Vellum CS over lay is 4" x 5 1/4" an image from Elements of Style was stamped with Versamark and embossed gold. It is attached at the top to the front with 4 mini glue dots. A Whisper White Ribbon is knotted around the front covering where the glue dots show through the Vellum CS.
  • Using the Hearts Framelits a heart was cut from Brushed Gold and a second smaller one from Whisper White.
  • Mr & Mrs from Tiny Tags was inked with Versamark and stamped onto the smallest heart and embossed gold, then it was attached to the Gold Heart. the Hearts were attached to the Whisper White Ribbon with a scrap of wire edge ribbon I had in a scrap box

Monday, January 16, 2012

Framelits Label Dies

If you haven't bought the Framelits yet you need to!

  • The card base is Melon Mambo cut with the largest of the Framelit Label Dies. The front is Basic Black cut with the next smaller size.
  • On the Basic Black CS I stamped the branch of roses with White Craft ink
  • On a scrap of Whisper White I stamped the Valentine phrase from Delightful Dozen, I inked it with Melon Mambo then went over the "Be my" with a Black marker before stamping. I then laid different Framelits over it until I found the one that framed the phrase the best. I sponged the edges with Melon Mambo ink and popped it up with Dimensionals.
  • After I had it put together I decided to add the 3 Rhinestones under the phrase.
So what do you think of Framelits?

Sunday, January 1, 2012

Happy New Year!

On our demonstrator forum there has been many discussions on CASEing
Copy
And
Share
Everything
there are a wide range of opinions from it is OK to CASE to you should never CASE, fortunately more are for then against. Pretty much everyone agrees if you CASE you must credit who you are CASEing.  Now sometimes I have a problem doing that. . . and the cards I am sharing today are cards I made that I know might be a CASE, but I didn't bookmark the idea. Why didn't I? Well as I scan blogs looking at what others have done I am usually looking at layouts and color combo not necessarily looking for something to CASE, but sometimes I will see a card that makes me decide to buy a stamp set that I don't already have, I guess we all have done that. Now sometimes by the time I order the set and then get the chance to use it I don't have anything but a memory of what I saw that made me decide to buy it, I have no idea how close these cards are to the one that inspired me to buy them but here they are, if you recognize them let me know I'd like to be able to compare what I have done with what inspired me to buy the set.

First up Field Flowers, I had marked this as a set I liked but hadn't bought it until October of last year, I bought it because I saw a card that "spoke to me" and though I couldn't find it when I had the set this is what it reminded me of.

  • The card base is Very Vanilla
  • Front of Basic Black under Very Vanilla
  • Hello Doily is stamped with Crumb Cake and the Field Flowers are stamped with Versamark and embossed in Black, Very Vanilla Seam Binding is knotted around the front
  • Best Wishes from Petite Pairs was embossed and punched out with a 1" circle, it is popped up with Dimensionals and the tiniest of the Pearls are added under the words
The next card uses stamp sets I had, I know that the color (purple isn't a color I use often) and lay out are the same but I am pretty sure that the card I had seen used different stamp sets.


  • Card base is Perfect Plumb 
  • Front of Elegant Eggplant under Confetti White
  • The rose spray from Elements of Style was stamped with Elegant Eggplant
  • An oval of Elegant Eggplant was cut with the Ovals die and the Big Shot, a piece of the scallop polka dotted ribbon was attached to the back of the oval and it was popped up with Dimensionals on the card
  • Thank you was stamped with Elegant Eggplant and stamped onto a strip of Confetti White that had the ends punched with the corner of the Curly Label punch it was added to the oval and Rhinestones were added to the ends.
So here are the two card that I made last year that how closely they are CASEd I am not sure, whoever you are that inspired me to make these cards I thank you!

So have a Happy New Year! 

Friday, April 22, 2011

Wonderful Favorites- Vintage Vogue

This is the card we made in our Hostess Club this month. The card is a Joy Fold card- go here if you want general directions http://www.splitcoaststampers.com/resources/tutorials/joy_fold_card/

  • The card bases are Pretty in Pink and Early Espresso.
  • For the DSP panels on my card I used the Very Vanilla from the pad of Neutrals, On the larger piece of DSP I stamped the rose image from Elements of Style with Pretty in Pink.  The smaller panel was stamped with Early Espresso using the leaf and swirls image from Vintage Vogue.
  • The large Vintage Vogue flower is Pretty in Pink with an Espresso glimmer brad, two of the smaller flowers are Regal Rose and one is Pretty in Pink, rock and rolled in Regal Rose the centers are the Pearl Jewels. These are all cut out and have a Dimensional on the backs of them.
  • The center panel is Very Vanilla CS that I have stamped the leaf and swirls with Old Olive and the small flowers with Early Espresso in the lower corner. Wonderful Mother is stamped with Early Espresso (used the Stamp a ma Jig). The cut out flowers were then added and a piece of Early Espresso ribbon was added.
So what do you think, anything you would have changed?
I hope that you have a wonderful day, if you need to order anything let me know.

Monday, March 14, 2011

Tiny Tags with Elements of Style

I was trying to come up with ideas for my club this month (before I had decided to go with the Easter theme) this was one I decided not to do (I couldn't think of a coordinating project).  I really like how the card turned out and may add a variation to one of the upcoming classes I am holding.
  • My card base is Very Vanilla
  • The front is cut a little smaller then I normally cut them 3 3/4" x 5" I used Cherry Cobbler with Elements of Style stamped with Versa Mark. I added a layer of Wild Wasabi also stamped with Elements of Style and Versa Mark.
  • I used the Beveled Windowpanes from the Occasions Mini for the focal point of the card. I stamped a flower image from Tiny Tags on Very Vanilla using the Cherry Cobbler and Wild Wasabi Markers. The image is held to the Windowpane with Cherry Cobbler Seam Binding and instead of a knot it is held together with one of the Green Rhinestone Brads from the main catalog.  I used snail adhesive to attach it to the card front.
I really like the richness of the colors and it was fun to work with the windowpanes.  I made one other card with the windowpanes that I'll show to you later.  Have a great day and go ahead and stamp something. ;)

Monday, February 21, 2011

Sale-a-bration Punch Bunch

This is the card that we made for February's club meeting. It isn't my usual style. but it was fun and everyone seemed to like it. There were tons of new things that they hadn't tried yet on this card.  Almost everyone of them picked this stamp set for their free set.
  • The card base is Crumb Cake onto the front of the card we splattered Early Espresso and Pumpkin Pie ink. We did this by filling the large tipped Aqua Painter with Rubbing Alcohol and picking up reinker ink and flicking it onto the card front. We stamped the swirled image from Elements of Style in both Early Espresso ans Pumpkin Pie. Then splotchy sprayed shimmer paint spray here and there.
  • We layered a piece of Peach Parfait DSP on Early Espresso CS, punched the edge with the Scallop Trim Boarder punch. then cut a V from the bottom of it and attached it to the card front.
  • We used markers to color the poppies, using Old Olive for the stems and Pumpkin Pie and Poppy Parade for the flower. This was stamped onto Very Vanilla CS and punched with the 1 3/4" circle punch.  We added Sticky strip to the back of the image and pleated Early Espresso Satin ribbon around the edge of it.  This was added to the card front with Dimensionals.
  • We used Crumb Cake Seam Binding to make the ruffled bow, this was done by tying a bow and then fraying the ends and pulling one of the frayed threads to make it ruffle up. We attached this with a Mini Glue Dot.e
  • We chose a phrase from Tiny Tags and stamped the on Very Vanilla and punched with the Jewelry Tag punch. and tied it to the bow with Linen Thread.
So a lot went into the cards but I think they turned out pretty, the girls were able to try so many products and techniques with this card.  I hope you enjoy the card. The idea for this card came from here.  http://www.soshelli.com/so-shelli-blog/2011/1/28/what-stampin-up-is-all-about.html